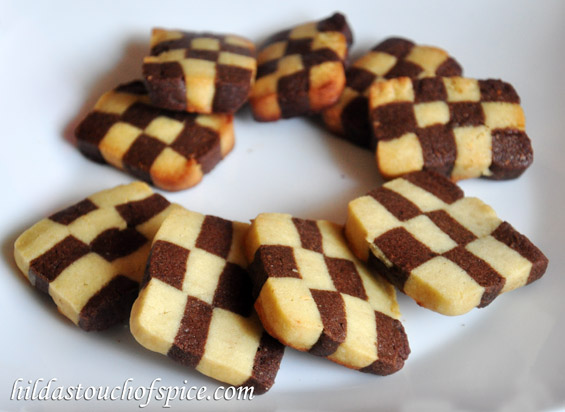
Checkerboard cookies are simple and easy to make even though they may look complicated and difficult. These cookies are popular in a combination of vanilla and chocolate but you could make them in flavors and colors that you love.
If you are looking for something to bake with children, especially to keep them busy and occupied during vacations or on weekends then you should definitely put these on your to-do list. It is also a wonderful activity to consider if you are looking forward to bond as family or even engage in creativity with friends.
These are ‘not too sweet’ but delicious slice and bake shortbread refrigerator cookies. Homemade and freshly baked, they look so beautiful. If you are having a community bake sale or a fun gathering then you can involve interested neighbors to make checkerboard, marble and flower shaped cookies as well. They are ideal for gifting at celebratory occasions especially at Christmas, New Year, Easter, Valentine’s Day, Diwali, Birthdays or on casual visits to friends and family. They are excellent to serve at children’s parties too.
I love checkerboards, marble and flowers… Do you remember the Checkered Eggless Banana Cake recipe I posted last year? It is interesting and fun to use different colors and designs in cooking and baking. It makes me feel really good and brings out the child in me.
So what are we waiting for? Let’s make these fabulous cookies… Just revel in the joy of making and relishing them at tea time with a cup of tea, pack them as short break eats for school kids, as a mid morning snack at work, nibble into them when you are hungry or serve them to your guests … 😀
Ingredients :
- 3 cups Maida (All Purpose/Refined Flour)
- 1 ½ tsp. Baking Powder
- ¼ tsp. Salt
- 1 cup Unsalted Butter (room temperature)
- 1 cup Sugar pwd./Caster Sugar
- 1Egg
- 1 tsp. Vanilla Essence/Extract
- 2 ¼ tsp. Instant Espresso/Instant Coffee Powder
- 60 gms. Dark chocolate (melted)
- 1 tbsp. Cocoa pwd.
Procedure :
In a sufficiently large bowl, combine flour, baking powder and salt. Set aside.
In another bowl, mix butter and sugar till soft and smooth.
Next add egg and vanilla essence. Mix well to combine.
Slowly, add in the flour; a little at a time until combined.
Wrap half the dough in cling film/plastic and place in the fridge.
Add espresso/Instant coffee, melted chocolate, cocoa powder to the remaining dough and mix well to combine.
Pat and shape the chocolate dough into a rectangular block (2 inches in width & height , 6 inches in length). Do the same with the vanilla dough.
Wrap in a plastic/cling film and refrigerate for an hour or until firm.
Cut each block of cookie dough into desired size for checkering along the length of the dough or cut each block into nine strips.
Refrigerate them on two baking sheets for about 10 mins or until firm.
Assembling the dough strips into a Checkerboard Pattern:
Here is how you go about alternating the pieces with chocolate and vanilla, then square if off and press together to create a checkerboard pattern…
Stack the strips of dough together in layers… rows of three with alternating pieces of dough (brown-white- brown ; then white-brown-white and again brown-white-brown).
Totally you should have stacked alternated logs of 3 rows. You can even have 4 rows if you wish! Be gentle with the dough.
Use one lightly beaten egg white mixed with one tbsp. water to brush the chilled strips and glue them together…
Brush tops and in between the strips with egg wash.
Wrap again in cling film.
Refrigerate the checkered dough for 2 hrs or until well set and firm.
Slicing & Baking the Checkerboard Cookies :
Remove one log of checkerboard cookies from the fridge and remove the plastic/cling film.
Trim the uneven ends of the log with a sharp knife, then slice the cookie log into ¼ inch slices.
Place on a baking sheet lined with parchment paper; leaving one inch spacing around the cookies.
Bake in a pre-heated oven at 180 C for 8-10 mins. or until the edges of the cookies just begin to color. (Depends on your oven settings).
The cookies should still be pale, but the bottoms should be very lightly brown.
At first, the cookies will be soft but will firm up on cooling.
Remove the cookie sheet from the oven and let them cool for 5 mins.; then transfer them to cool completely on a wire rack.
In case you have sufficient dough then you may bake the next log the same way or freeze to use later.
If you want to bake all the cookies right away, then bake them in batches & preferably one tray at a time to retain uniform color of the cookies.
Serve at tea time or eat whenever you feel like biting into a cookie/biscuit… Enjoy! 😀
Fun with left over Cookie Dough :

For Marble Cookies :
I had some trimmings & left over dough so I combined the chocolate & vanilla trimmings & then rolled into a log, sliced, and baked them…. VOILA! I had MARBLE COOKIES… Aren’t they pretty?
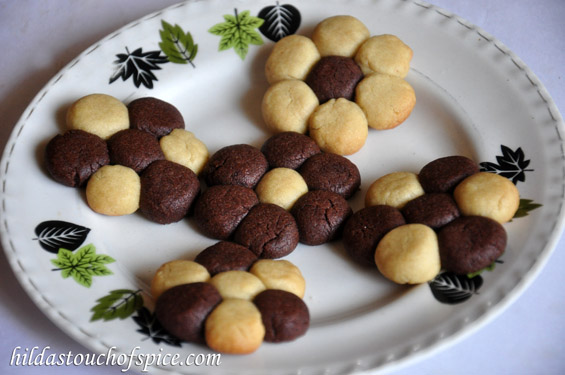
For Flower Cookies :
I shaped the left over dough into FLOWER COOKIES… I rolled the dough into a long rope, cut them at intervals, rolled them into balls & then shaped them into flowers. Aren’t they gorgeous?
Tips & Suggestions :
- For perfect & neat cookies it is extremely important that the dough is cold and firm to retain the firm edges; so you need to refrigerate each time the dough turns soft.
- Indian summers are not kind to refrigerator cookie dough. I had a difficult time while molding these cookies & had to refrigerate several times. Besides, we had several power cuts during short intervals without any notice so I’m glad that my checkerboard was quite neat.
- The key to perfect cookies each time is to chill the dough for a period of 2 hrs. or overnight.
- Use a blunt knife/palette knife/bench scraper to neaten up the sides of the cookie dough as you pat, shape and roll, so you get a uniform rectangle.
- To retain and maintain shape & neatness, use cling film or plastic wrap to roll and wrap the dough.
- A pizza cutter is a perfect tool to straighten edges and/or use a sharp knife to cut the sides of the rectangle to get straight and even cuts.
- If you are looking for perfection then use a ruler to mark the dough at intervals and help you to cut the strips neat, straight and even.
- The unbaked cookie dough can remain refrigerated in the chiller for 2 to 3 days; this is inclusive of the time it was refrigerated as dough before it was formed into checkerboards. After this period, if not baked; it must be frozen.
- Wrap the logs of dough well and place them in the freezer for about a month or more, to bake at a later date.
- On the day of baking, remove the checkerboard logs from the freezer and let them thaw in the fridge preferably overnight to save time before slicing & baking; not at room temperature. Slice and bake semi-frozen.
- To ensure even color, bake one cookie sheet at a time.
- Always chill sliced and unbaked cookie dough if you intend baking within a day or two.
- You may use a food processor, an electric stand mixer or a hand blender but your hands are the best to knead the dough!


2 Comments
beautiful recipes with delicious clicks. Loved the idea of flower cookies. never seen them before. bookmarking the page 🙂
They all looks beautiful,checkerboard pattern is so perfect..love it