Ever since I have returned from a vacation in Kerala, I am only thinking green & wild! Forests, tea gardens, flora & fauna.. birds, bees, trees, wild animals.. Oh my!! The list is endless.. The “Periyar Tiger Reserve” was a big disappointment & so all the while I was thinking of good old
Africa.. the Safaris..the animals in the wilderness & the greatest consolation was the Animal Planet, National Geographic & Discovery channels on television. I just can’t express my happiness when I happened to come across Faride’s blog “AZ Cookbook” & the picture of this marvellous Zebra Cake which captivated me. Thanks Faride for inspiring me to bake this one.
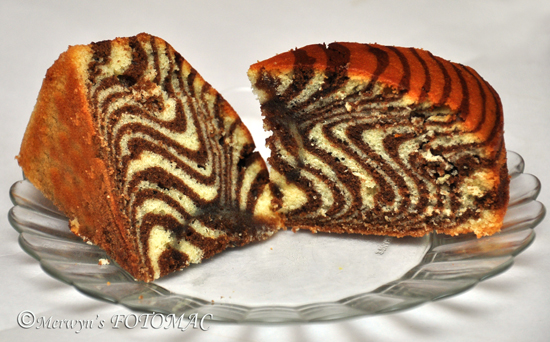
This pretty cake with stunning zebra stripes is an absolute winner on any occasion especially for a child’s birthday with an animal theme! It is ideal with a hot steaming cup of tea or coffee too. The zebra pattern technique is so simple & easy even though it looks intricate. All you need is a little extra patience for creating this impressive & amazing cake. I had fun baking this cake.
If you look at the picture closely; the way I have arranged the slices, the pattern on top of the cake reminds one of the stripes on the Tiger! So here it is ..the wonder of wonders.. The Zebra & The Tiger!!
When I sliced the cake I just couldn’t help but keep admiring it for a long time & not wanting to eat it even though it was extremely delicious! Faride & I share the same sentiment about the Zebra Cake. So here we go hand in hand .. Follow me on this wild trail .. Enjoy!! J
Ingredients :
300 gms. Refined Flour (Maida)
4 Eggs (at room temp.)
250 gms. Granulated Sugar
250 ml.Vegetable Oil/Cooking Oil of your choice
250 ml. Milk (at room temp.)
1/3 tsp. Vanilla Essence
1 tbsp. Baking Pwd. or 1 tsp. Baking Soda
3 tbsps. Dark Cocoa Pwd. (I used Cadbury’s)
Method :
Lightly grease a 9 inch baking pan with oil, line it with parchment paper & keep aside. Pre-heat the oven to 180C.
In a large bowl, sift together refined flour & baking pwd. & keep aside for further use.
In another sufficiently large bowl, combine sugar & eggs.
Using an electric hand held blender/mixer or a wire whisk beat together until the mixture is creamy & light in color.
Add milk, oil & vanilla essenceto the whisked mixture; continue beating till well blended.
Then gradually fold in the flour; a little at a time to the wet ingredients & beat until the batter is smooth & the dry ingredients are thoroughly incorporated. (Avoid over beating to prevent air pockets from forming in the batter).
The mixture should not be too thick or too thin. If the mixture is too thin then add a little flour.
Divide the mixture into two equal portions.
Keep one portion plain & add cocoa pwd. into the other & mix well.
Assembling the Zebra Cake in the pan before baking :
Use two ladles for scooping the cake batter; one for the plain & the other for the cocoa batter.
Use a ladle that would hold 3 heaped tbsps. of cake batter.
First scoop the plain batter & gently pour in the middle of the baking pan.
Immediately scoop & pour the cocoa batter on top of the plain batter.
Do not stop & wait until the previous batter spreads.
Keep pouring & alternating each batter continuously.
Do not attempt to spread the batter or tilt the pan to distribute the mixture.
It will automatically spread itself on its own & fill the pan gradually.
Continue layering & alternating the batter till you finish both.
Slowly transfer the baking pan in the oven without disturbing the layers of the batter. Bake for about 40 mins.
Do not open the door of the oven for atleast the first 20 mins. or the cake will shrink & will not rise well.
Insert a toothpick in the centre of the cake to check if the cake is ready.
It should come out clean when ready.
Remove from the oven. Let it rest for a few minutes & then invert the cake onto a plate. Invert again & place on a cooling rack. Let it cool completely.
Slice the Zebra Cake in wedges & serve it preferably plain.
Decorate with icing or sift some confectioner’s sugar before slicing if you prefer.


2 Comments
Looks beautiful!
I tried it… cake was just awesome. Couldn't believe my eyes. Thank u Hilda…
Latha Kesav,
http://www.wowyummy.com