
Sugar cookies are soft and crumbly on the inside and lightly crisp on the edges. It does not matter if they are plain cut outs in various shapes, crusted with sugar or fancily decorated with colorful frostings; they do make excellent gifts all the year round. They bring a smile and spread cheer when served or gifted during festive occasions. They are so simple but elegant that a beginner can bake these cookies with ease.
With Halloween just around the corner, I thought of baking these beautiful cookies and frosting them with the popular spider web design which is so pretty. The amazing spider web looks very difficult and complicated but is actually quite easy and fun. It may be a tad difficult if you are out of practice but as you start working on several cookies you will gradually get comfortable and enjoy your piece of art! Baking and frosting can be a relaxing and enjoyable when you include children to make unique and personalized cookies.
Yesterday, the humid rainy weather was not very conducive to these cookies. I baked them in the morning and frosted them in the night. I did not give the flooded cookies a chance to rest awhile before I piped my design, so some of them got smudged. But in the morning I was quite happy with the result. I liked the smudged look on some of them. I was happy with one cookie which was perfect. Just the thought of Halloween fun made me feel good.
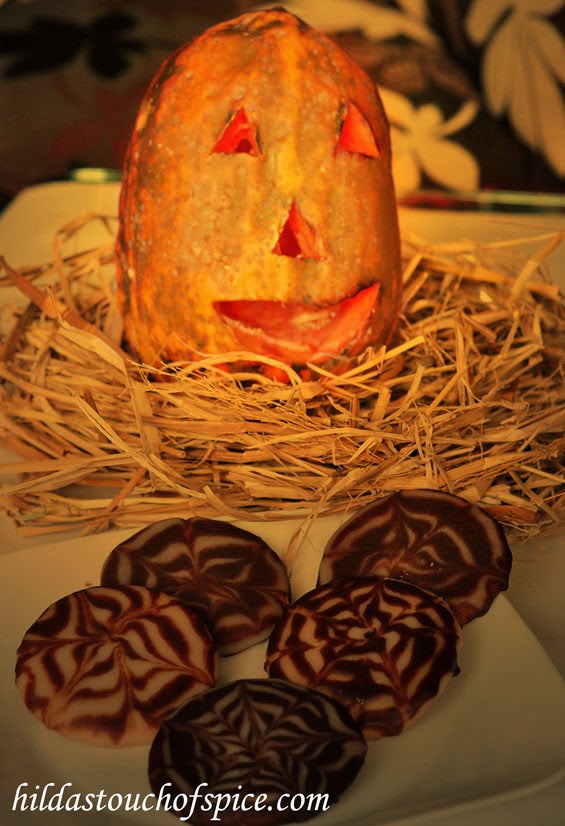
This morning I carved a Jack-o-Lantern with a Papaya instead of the traditional Pumpkin. I wanted to set the mood for Halloween with the gorgeous Spider Web Sugar Cookies. I had a papaya in my fruit basket and while I looked at it just before breakfast, I knew it would be much easier to carve! What a beautiful prop it was along with the hay which was saved when we enjoyed the King of fruits (Mangoes) last summer.
Enjoy and try out the Papaya Jack-o-Lantern but most of all the Spider Web Sugar Cookies … smooth and dry on the top but deliciously soft and melt in the mouth!
Ingredients:
- 400 gms. Maida/All Purpose Flour
- 200 gms. fine granulated White Sugar
- 230 gms. unsalted Butter (room temperature)
- 2 Eggs
- 1 tsp. Baking Soda
- ½ tsp. Salt
- 2 tsps. Vanilla Essence
Procedure:
In a sufficiently large bowl, whisk and sift together maida, baking soda and salt. Set aside.
In another bowl, beat butter and sugar; until light and fluffy.
Then, beat in eggs and vanilla essence.
Slowly add the flour mixture to the butter mixture; beat to form a smooth and soft dough.
Divide the dough into 3-4 balls and wrap in cling film.
Refrigerate for about 30 mins. or until firm enough to roll.
When ready to prepare cookies, line 2 baking trays with parchment paper.
Remove one ball of chilled dough from the fridge and roll out the dough on a lightly floured surface to a thickness of ¼ inch.
Make sure you use enough flour to roll to avoid it from sticking to the base of the rolling board or counter surface.
Cut out desired shapes using a lightly floured cookie cutter and transfer the cookie cut outs to the lined baking trays.
Refrigerate the unbaked cookies for about 15-20 mins.
Bake the cookies in the pre-heated oven at 177 C for about 8-10 mins. or until the edges are just starting to turn lightly brown.
Cool on the baking tray for a few minutes and then transfer them to a wire rack to cool completely.
Frost the cookies as desired only when completely cooled.
Let us proceed to prepare Spider Web Cookies with glace icing…
For the Glace Icing: To be used for glazing and piping spider webs.
- 3 cups powdered White Sugar
- ¾ cup Confectioner’s Sugar /Icing Sugar
- 6 tbsps. Milk or Water
- 6 tbsps. Corn Syrup
- 1 tsp. Vanilla Essence
Procedure:
In a sufficiently large bowl, whisk together powdered sugar and icing sugar with milk or water until smooth. Stir in corn syrup and vanilla essence. This mixture will be smooth and thin and will easily run in a thin drizzle when you lift up the whisk. The consistency is just right for glazing.
It is time to divide the prepared glaze into bowls… Divide the glaze into four bowls. To prepare two-tone spider web designs just the way I did follow the steps carefully…
Flooding the Cookies with Base Coat:
First take two bowls of thin glaze which we just prepared. To one bowl add dark brown or black color. I used store bought dark thick caramel and a teaspoon of cocoa for this. Make sure you mix well. Start by setting a mesh/grid/metal rack on a tray lined with foil or parchment and place the cookies on it with enough space between the cookies. Alternately, glaze the cookies with (base color) thin white glace icing and the prepared black/brown icing. Gently pour a teaspoon or tablespoon of icing on each cookie depending on the size. Gently spread it out to cover till the edges of the cookie. Let the excess drip which will collect in the lined tray. Allow the icing to set for about 5-8 mins.; then continue with piping the spider web design. Do not allow the icing to firm up completely. Test by trying out on a cookie.
The Spider Web Technique:
To prepare the icing for piping designs, add sugar powder or icing sugar to both the bowls to thicken. Just eyeball the amount of sugar. If it is too thick add water or milk to thin and if it is too thin add more sugar to thicken. To one bowl, add color as mentioned above. Place this thick icing in two piping bags fitted with a plain thin writing nozzle or a slightly thick plain nozzle with a round tip (it all depends on your preference. You could even fill a zip lock bag or a parchment paper cone and snip one end depending on how thin or thick you want your piping to be). Start from the center of the cookie and pipe spirals/swirls with enough gap in between the spirals. Cover the entire cookie with the spiral until you reach the outside edge.
Use a toothpick to start from the center of your spiral/swirl. Lightly drag it in a straight line up to the edge. Repeat and continue around the cookie with this step or you can alternate i.e. by dragging from inside to out and then outside to the centre. It is preferable to allow the cookies to dry overnight or for 24 hours to avoid dents and damage to the frosting and designs.
Frosted cookies will keep several days in an airtight tin/box.
To retain the frosting without damaging the design; store between layers of parchment paper.
Enjoy your Halloween treat! 😀
Tips & Variations:
- To chill the dough faster and avoid using excess flour for rolling; roll the dough between two sheets of parchment paper, place on flat trays in the fridge for about 30 mins. and then cut out shapes.
- Flooding cookies with frosting makes for a neater finish. Allow the excess to spill on the drip tray. Let them dry overnight to harden completely for stacking them up.
- To save time, it is a good idea to flood multiple cookies or 4-5 cookies so that your first cookie will be ready by then for piping designs.
- For variations, experiment with a wide spectrum of color combinations and designs.
- This quantity of cookie dough makes about 40 cookies but I got much more because I used different cutter shapes and sizes.


